
Let's begin by stretching our hands and fingers because we are about to make a 3 row bead necklace which is very easy to make.
The first photo clearly shows the pattern that's why I placed it that way but normally its a round shaped necklace design.
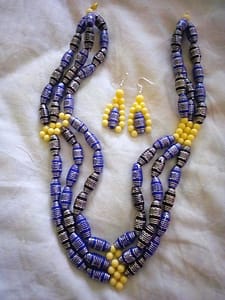

Materials Used For The Bead Necklace
- A pair of scissors
- Nylon thread
- Beads: colour blue, black and cream
- Earring hooks
- Necklace hook
First Step Of The Bead Necklace Design
In the necklace hook put three threads.For our bead necklace to have three rows the threads must be three.

In each of the 3 rows add 6 or 7 big beads color blue and black.
You can choose to add blue then the black bead on each row continuously or blue beads in one row and the other row black beads,just arrange the beads in whichever way you want.
We already have 6 or 7 beads in each row let's make the pattern with our tiny cream beads
2nd Step Of The Bead Necklace
Row 1
Lets begin with Row1 add four cream beads like the photo below

Then pass the row 1 thread through the first cream bead like the photo below

Row 2
The shape below will be formed,then take Row 2 thread pass it in lower middle cream bead like the photo below

Put three beads in row 2 which is now passing the lower middle bead in row 1.The photo above.
The reason we are putting 3 beads and not 4 in this particular Row 2 its because the bead that Row 2 has been passed through represents the 4th bead
Row 2 should be passed through the same bead its passing through but from the opposite direction and you will have this shape below


Row 3
Pass Row 3 through the lower middle cream bead in row 2 add 3 cream beads pass the row 3 through the same bead its passing through but from the opposite side and you will have this


We are done with patterns add 7 beads in each of the three rows then add another pattern following the step 2 process above

Step 3 Pattern
After the pattern add 7 beads then let's create another different pattern this is the last pattern
We are going to create a pattern that I have created in my previous jewelry DIY articles check the article below
Pink&Cream Beaded Necklace DIY
Row 1 & 2
Take four beads put them in row one the thread should go through two beads and not one bead like the previous pattern you will have this shape below

Form another cluster of the pattern and row 1 has two clusters
Take Row 2 put it through the lower beads and that's it

Row 3
Add two beads in the row and pass the row 3 through the 2 lower beads in Row 2 from the opposite side form another cluster in the same row 3 using the previous procedure

We are done with that pattern add 7 beads to each row put a hook and loosely tie the threads around the hook so that the rows can just acquire a gentle round shape.
For an affordable and reliable web hosting company check out hostnali here is the link https://hostnali.co.ke/clients/aff.php?aff=102
Earrings
Take a short thread put four beads and in a circular movement put the one side of the thread through one bead the shape below is formed
Note :Use the step 1 pattern procedure for the necklace.

Add this blue bead like the photo below

Then add 4 beads in each thread like the photo below

Then pass each thread through the side beads in the pattern


The threads have now merged add one big bead and a hook


We are done for today.
Affiliate links
There are affiliate links on this article.Clicking on the links will not cost you money
The purchase of the products in those links will cost you the money indicated on the products.
For more information on the affiliate links have a look at our Disclaimer