
By Charity Mwengi.
Disclaimer
There are affiliate links on this article.Clicking on the links will not cost you money but the purchase of the products in those links will cost you the money indicated on the products.For more information on the affiliate links have a look at our Disclaimer
Copyright
How would you feel if someone used your work and claimed it as theirs? Sad right? Kindly give credit where it's due. You can use the DIY below to create your bracelets or necklaces but mention me as the designer.
Bridal Bracelet
Today we are making a bridal bracelet there will be no necklace however if you are interested in a necklace DIY you can check my previous articles on necklace DIY's.
Tools required to make the bridal bracelet
A pair of scissors
Three elastic strands of threads
Beads
The reason I'm using the elastic thread it's because the bridal bracelet will not have a hook, so I had to use the stretchy elastic thread that makes it possible for the bridal bracelet to be worn.
We begin
Cut three elastic threads like the photo below

In each thread add 4 black beads the photo is below

In the middle thread add the following beads in the following order check the photo below
Using the same middle thread that has beads put it through the white bead like photo below

Then continue moving that thread up to the middle.
Leave the middle thread there for now
Let's focus on the outer two threads, add 2 more beads to them the total number of beads on the left thread will now be 6 and on the right thread will now be 6
Then take the left thread pass it through the black bead like the photo below

Do the same to the right thread pass it through the black bead on the right side. You will have this shape like the photo below

Step 2
Following the step 1 procedure create the middle bracelet pattern then
Add four beads to the left and right thread like the photo below

Put the left and right outer thread through the black bead, like the photo below

With the high cost of living and high food prices check the affordable food prices on jumia Kenya using this link

I have shown you step 1 and step 2 of making our bridal bracelet please proceed until you create 5 inside patterns(the ones with white and read beads) in order to achieve a bracelet that fits the standard wrist size.
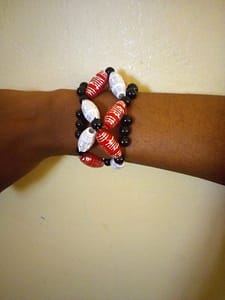
My joined bracelet has this design

The reason being, when I began I only put 4 beads in the middle thread, while the outer 2 threads have 6 beads remember we added them along the way.

And we are done for today there are more articles on jewelry DIY be sure to check them on my website