
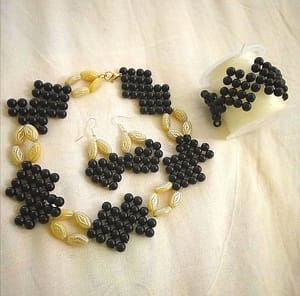
The Class Begins (there are photos)
- The pattern begins with 4 beads no wings attached.
- The 2nd pattern with 4 beads has wings attached.
- The 3rd pattern with 4 beads has no wings attached.
- The 4th pattern has wings attached both sides.
NB:after attaching wings to one pattern ,we skip one pattern the next pattern wings are attached.However if you have few beads you can skip two patterns.
5. The moment you attach wings to the 4th pattern you immediately start counting it as your number1pattern then go to number 2 pattern which doesn't need attaching of wings. No.3 attach wings both sides, No.4 pattern connects you with the next pattern therefore do not put wings on it.
We are using the following materials
- A pair of scissors
- An elastic string
- Black beads
- 2earring hooks
- One necklace hook
Cut a long elastic string because the necklace design is likely to use up much of the string
Put the following in this order:
Two black beads, the necklace hook and then two last black beads.The necklace hook is definitely at the middle.
Check the photo below

The string is divided into two right and left string.
Left string.
Take the left string put it in the last bead that is on the right string. Check the photo below

The shape on the photo below will be formed

Again put three beads on the left string then put the left string (the one that has beads)through the bead which is at the middle check photo below

This shape will be formed check photo below

All the strings are in the middle black bead right? I want us to give the necklace wings so let's take the left string and put it through the 2nd bead on your left.Check the photo below

On the left string still let's put 3 beads check photo below

Then put the left string through the opposite side of the same bead it originated from.
Check photo below

This is the shape that is formed.Check photo below.

You can find everything on jumia Kenya including unique jewelry designs and beads click the link below https://kol.jumia.com/s/ERv5pjQ
Right string
The same procedure we used on the left string will definitely be used here
The right string was definitely left in the middle bead so let's put it through the next bead check photo below.

Then let's put 3 beads on the right string check the photo below

Let's put the right string that has beads in the opposite side of the bead that it originated from:Check the photo below

Now we have this check photo below

Take the right string pass it through the middle bead and then add 3 beads on that same string check photo below

Then put the right string back in the opposite side of the middle bead it originated from check photo below check 2photos below


Then continue putting the right string in the 2remaining beads leave the string at the middle bead check two photos below


Going Back to the Left string
The left string was definitely left hanging after putting the wings
Take the left string put it in the middle bead check the photo below
Continue running the left string through the three beads till it meets with the right string and you will have this shape below:


You can continue with this pattern or choose to add some different beads in the middle like I did
Check photo below

That is the left string that has 4 beads so let's put the the left string at opposite side of middle bead check 2 photos below:


Run the the two strings that are now at the Center back through the 4 beads until
The strings meet at the centre.Check photo below:

Repeat the whole process till you achieve this below:


How to make the bracelet (with photos)
Follow the same pattern with the necklace but let it be short than the necklace check photo below

When it came to attaching wings I had to skip two patterns so that the bracelet isn't too long
How to make earrings (with photos)
Put four beads in a string (there is no hook)
The left string should be put in the last bead in the right string and the following shape will form check 3 photos below:


I now know you already know how to attach wings ,in that one pattern attach wings that have 4 beads in each side and you'll have this shape in the photo below:

Below attach a wing check 2 photos below.

Now let's run both the left and right string through the beads in ascending order until both strings make it to the top check photos below:


Insert the two cream big below in each string like photo below:

And now we attach the hook
If its hard for you at first just know practise makes perfect keep practising and be patient with yourself its not like there is a deadline for learning all these.
Thank you for reading till the end.
For enquires reach me on my email: blogwiththehuntress@gmail.com
[contact-form-7 id="1466" title="Comments 103"]